DeerFlow 代码库走读
2025-09-08 07:00 广东
基于 Dify 的 Agent 模式,实现了对告警上下文的分析,但深度依然有限

DeerFlow 代码库走读
最近一直在研究深度研判智能体。前期基于 Dify 的 Agent 模式,实现了对告警上下文的分析,但深度依然有限。周四看了 jiejie 用 DeerFlow 实现的效果,整体更具备通用性,遂周末拉取 DeerFlow 的仓库代码进行了学习。
0x1. 项目概述
首先,让我们了解 DeerFlow 是什么:
DeerFlow(Deep Exploration and Efficient Research Flow)是一个社区驱动的深度研究框架
它结合了语言模型(LLM)与专业工具(如网页搜索、爬取、Python代码执行等)
主要用于自动化研究过程并生成全面的报告
0x2. 核心架构
先看下整体的调用架构图。
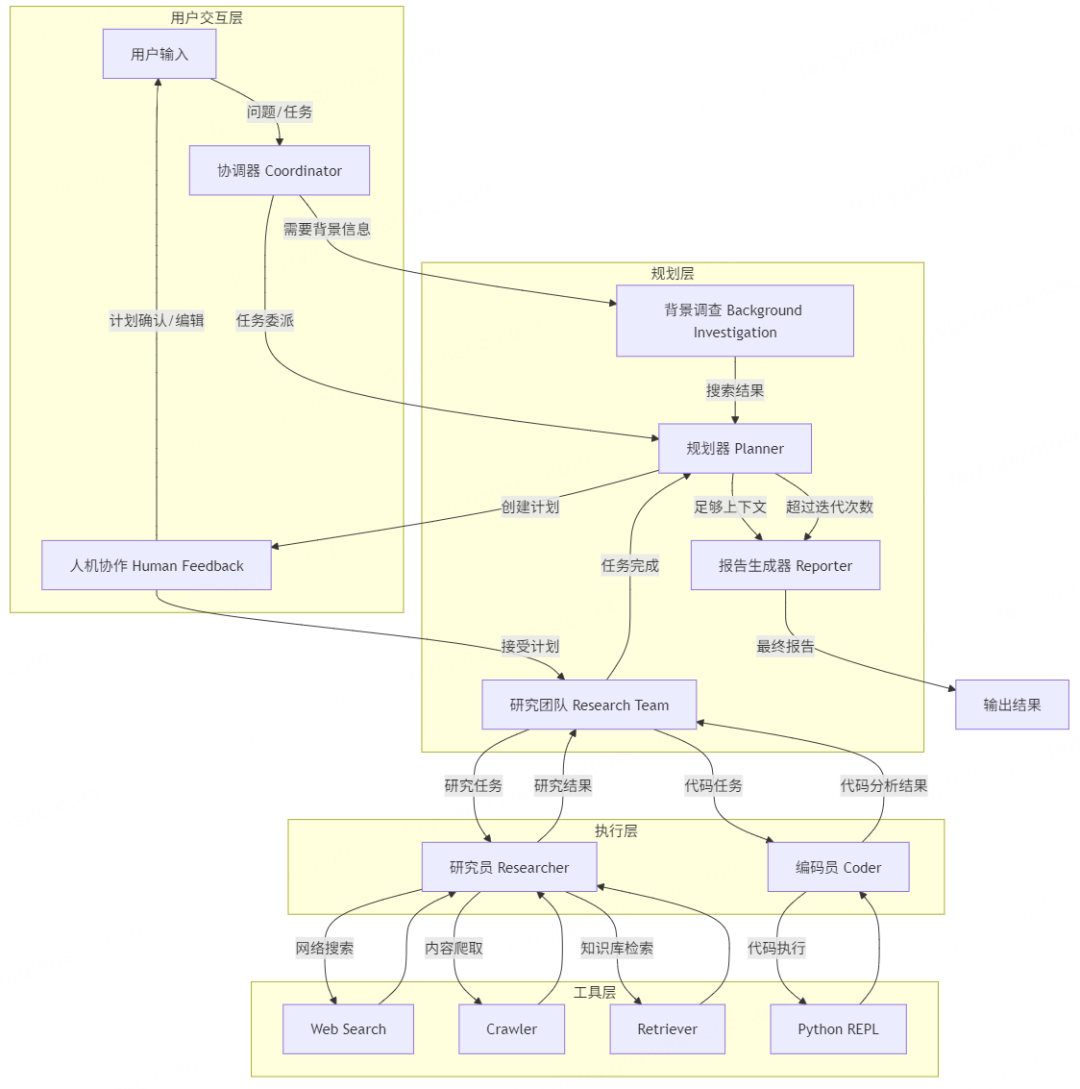
DeerFlow 采用模块化的多agent系统架构,基于 LangGraph 构建。主要包含以下组件:
Coordinator(协调器):系统的入口点,管理工作流生命周期
Planner(规划者):负责任务分解和制定研究计划
Research Team(研究团队):包括:
Researcher:执行网络搜索和信息收集
Coder:处理代码分析和技术任务
Reporter(报告生成器):汇总研究结果并生成最终报告
0x3. 代码结构概览
让我们先了解项目的基本目录结构:
“不太重要的目录先忽略了,比如docs/example/assets
deer-flow/├── main.py # 项目入口点├── src/│ ├── config/ # 配置相关文件│ ├── graph/ # LangGraph 相关代码│ ├── agents/ # 智能体实现│ ├── prompts/ # 提示模板│ ├── tools/ # 工具函数│ └── workflow.py # 工作流实现├── web/ # Web UI 代码└── README.md # 项目文档0x4. 从入口开始理解
让我们从 main.py 文件开始,这是程序的入口点:
# 简化的主要流程def main(): # 让用户选择语言 language = inquirer.select(message="Select language / 选择语言:", choices=["English", "中文"]).execute() # 让用户选择或输入问题 initial_question = inquirer.select(...).execute() # 运行智能体工作流 ask(question=initial_question, ...)if __name__ == "__main__": # 解析命令行参数 parser = argparse.ArgumentParser(description="Run the Deer") # ... 解析参数 ... # 根据参数运行不同模式 if args.interactive: main(...) else: ask(question=user_query, ...)main.py 的核心功能是:
提供命令行接口,接受用户输入的问题
支持交互式模式和直接输入模式
最终调用
workflow.py中的run_agent_workflow_async函数
0x5. 工作流实现
接下来看 src/workflow.py,这是工作流的核心实现:
# 创建图graph = build_graph()asyncdef run_agent_workflow_async( user_input: str, debug: bool = False, max_plan_iterations: int = 1, max_step_num: int = 3, enable_background_investigation: bool = True,): # 设置初始状态 initial_state = { "messages": [{"role": "user", "content": user_input}], "auto_accepted_plan": True, "enable_background_investigation": enable_background_investigation, } # 配置 config = { "configurable": { "thread_id": "default", "max_plan_iterations": max_plan_iterations, "max_step_num": max_step_num, # ... 更多配置 ... }, } # 运行图并处理输出 asyncfor s in graph.astream(input=initial_state, config=config, stream_mode="values"): # 处理输出...workflow.py 的核心功能是:
创建工作流图(通过调用
build_graph())定义
run_agent_workflow_async函数来执行工作流处理工作流的输出并显示给用户
0x6. 图构建
现在看 src/graph/builder.py,了解图是如何构建的:
def _build_base_graph(): # 创建状态图构建器 builder = StateGraph(State) # 添加节点和边 builder.add_edge(START, "coordinator") builder.add_node("coordinator", coordinator_node) builder.add_node("background_investigator", background_investigation_node) builder.add_node("planner", planner_node) builder.add_node("reporter", reporter_node) builder.add_node("research_team", research_team_node) builder.add_node("researcher", researcher_node) builder.add_node("coder", coder_node) builder.add_node("human_feedback", human_feedback_node) # 添加条件边 builder.add_conditional_edges( "research_team", continue_to_running_research_team, ["planner", "researcher", "coder"], ) # 返回构建器 return builder# 构建图def build_graph(): builder = _build_base_graph() return builder.compile()这个文件定义了工作流中各个节点之间的连接关系,使用 LangGraph 的 StateGraph 构建了一个有向图。
0x7. 状态定义
状态定义在 src/graph/types.py 中:
class State(MessagesState): # 运行时变量 locale: str = "en-US" research_topic: str = "" observations: list[str] = [] resources: list[Resource] = [] plan_iterations: int = 0 current_plan: Plan | str = None final_report: str = "" auto_accepted_plan: bool = False enable_background_investigation: bool = True background_investigation_results: str = None这个类定义了工作流中使用的状态变量,包括语言区域、研究主题、观察结果、当前计划等。
0x8. 节点实现
最核心的部分是 src/graph/nodes.py,它定义了各个节点的具体实现:
8.1 Coordinator 节点
def coordinator_node(state: State, config: RunnableConfig) -> Command[Literal["planner", "background_investigator", "__end__"]]: # 记录日志 logger.info("Coordinator talking.") # 应用提示模板 messages = apply_prompt_template("coordinator", state) # 调用 LLM 并获取响应 response = get_llm_by_type(AGENT_LLM_MAP["coordinator"]).bind_tools([handoff_to_planner]).invoke(messages) # 决定下一步去哪里 goto = "__end__" if len(response.tool_calls) > 0: goto = "planner" if state.get("enable_background_investigation"): goto = "background_investigator" # 返回命令,更新状态并指定下一个节点 return Command( update={"messages": messages, "locale": locale, "research_topic": research_topic}, goto=goto )8.2 Planner 节点
def planner_node(state: State, config: RunnableConfig) -> Command[Literal["human_feedback", "reporter"]]: # 生成研究计划 messages = apply_prompt_template("planner", state, configurable) # 调用 LLM 生成计划 llm = get_llm_by_type(AGENT_LLM_MAP["planner"]) response = llm.stream(messages) # 解析计划并决定下一步 try: curr_plan = json.loads(repair_json_output(full_response)) # ... 处理计划 ... except json.JSONDecodeError: # ... 错误处理 ... # 返回命令 return Command(update={...}, goto="human_feedback")8.3 Researcher 和 Coder 节点
async def researcher_node(state: State, config: RunnableConfig) -> Command[Literal["research_team"]]: # 准备工具 tools = [get_web_search_tool(configurable.max_search_results), crawl_tool] # 执行研究步骤 return await _setup_and_execute_agent_step(state, config, "researcher", tools)async def coder_node(state: State, config: RunnableConfig) -> Command[Literal["research_team"]]: # 执行编码步骤 return await _setup_and_execute_agent_step(state, config, "coder", [python_repl_tool])8.4 Reporter 节点
def reporter_node(state: State, config: RunnableConfig): # 准备报告输入 input_ = { "messages": [HumanMessage(f"# Research Requirements\n\n## Task\n\n{current_plan.title}\n\n## Description\n\n{current_plan.thought}")], "locale": state.get("locale", "en-US"), } # 应用提示模板 invoke_messages = apply_prompt_template("reporter", input_, configurable) # 调用 LLM 生成报告 response = get_llm_by_type(AGENT_LLM_MAP["reporter"]).invoke(invoke_messages) # 返回最终报告 return {"final_report": response.content}0x9. 智能体配置
在 src/config/agents.py 中定义了各个智能体使用的 LLM 类型:
# 定义智能体-LLM 映射AGENT_LLM_MAP: dict[str, LLMType] = { "coordinator": "basic", "planner": "basic", "researcher": "basic", "coder": "basic", "reporter": "basic", # ... 更多智能体 ...}0xA. 提示词模板
项目使用了大量的提示词模板,存储在 src/prompts/ 目录下。例如,planner.md 定义了 Planner 智能体使用的提示模板:
# DetailsYou are a professional Deep Researcher. Study and plan information gathering tasks using a team of specialized agents to collect comprehensive data.## Information Quantity and Quality StandardsThe successful research plan must meet these standards:1. **Comprehensive Coverage**: - Information must cover ALL aspects of the topic - Multiple perspectives must be represented - Both mainstream and alternative viewpoints should be included... ...0xB. 工作流程总结
最后总结一下 DeerFlow 的完整工作流程:
用户输入:用户通过命令行或 Web UI 输入问题
初始化:
main.py解析输入并调用run_agent_workflow_async工作流执行:
Coordinator节点接收问题并决定是否需要背景调查如果需要背景调查,调用
background_investigation_nodePlanner节点制定研究计划用户可以审查并修改计划(可选)
Researcher和Coder节点执行具体的研究步骤所有研究结果被收集到
observations中Reporter节点汇总信息并生成最终报告输出结果:最终报告显示给用户
题外话,字节也有人基于 Eino 框架实现了 deerflow-Go,对 Go 感兴趣的可以移步。
0xC. 下一步计划
准备近期发布系列文章:
给出利用 DeerFlow 结合内部工具完成研判的案例
上下文工程(context engineering)介绍
大模型研判的效果,如何用量化方法进行评判